Are your countertops overflowing, and your cabinets crammed with pots and pans? A ceiling pot rack can be a revolutionary solution, transforming kitchen chaos into organized elegance. This comprehensive DIY guide will walk you through every step of safely installing a ceiling pot rack, ensuring it’s not only functional but also a beautiful addition to your culinary space. From selecting the perfect spot to securing it firmly, we’ll empower you with the knowledge to reclaim your kitchen and showcase your cookware with confidence.
Why a Ceiling Pot Rack is a Kitchen Game-Changer
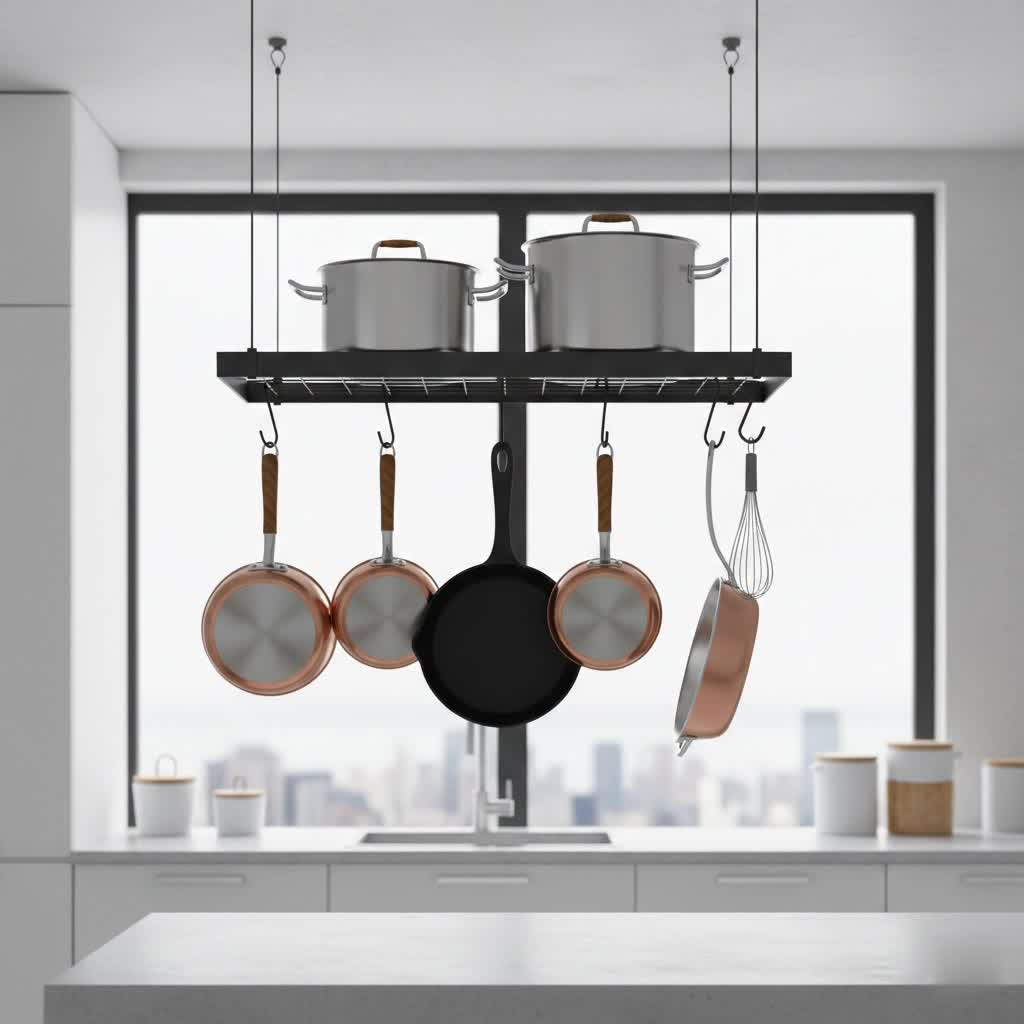
A ceiling pot rack offers an array of benefits that extend beyond simple storage. Primarily, it excels at freeing up valuable counter and cabinet space, instantly making your kitchen feel larger and more organized. Instead of rummaging through stacked pans, your cookware becomes easily accessible, hanging in plain sight for quick retrieval. Beyond its practical advantages, a well-chosen pot rack can also add significant aesthetic appeal, acting as a stylish focal point that elevates your kitchen’s overall design and character.
Understanding the Types of Pot Racks
While various pot rack styles exist, for ceiling installation, you’ll primarily encounter designs intended to hang directly overhead. These often come in rectangular, oval, or round shapes, each offering different aesthetic and storage capacities. Rectangular racks provide substantial linear storage, ideal for larger kitchens, while oval and round options can be excellent for smaller spaces or as a central feature above an island. Regardless of shape, the key consideration for a ceiling-mounted unit is its structural integrity and how it will attach to your ceiling.
Essential Tools and Materials for Installation
Before you begin, gathering the right tools and materials is paramount for a safe and successful installation. Here’s what you’ll need:
- Stud Finder: This is non-negotiable for locating ceiling joists, which are crucial for secure mounting.
- Drill and Drill Bits: Select bits appropriate for drilling pilot holes into wood joists or for the specific anchors supplied with your kit.
- Ladder: A sturdy ladder is essential for safely reaching your ceiling.
- Measuring Tape: For accurate placement and spacing.
- Pencil: To mark drilling locations.
- Safety Glasses: Protect your eyes from falling dust or debris.
- Pot Rack Kit: This typically includes the rack itself, chains, S-hooks, and mounting hardware.
- Optional (with caution): Heavy-Duty Toggle Bolts or Anchors: Only consider these if you absolutely cannot align your rack with joists and are certain your ceiling material can support the load. Always refer to the manufacturer’s weight specifications.
Pre-Installation Checklist: Planning for Success
Thorough planning is the cornerstone of any successful DIY project. Take these steps before drilling:
- Assess Your Kitchen Space: Consider your ceiling height. You’ll want the pot rack high enough to clear heads, yet low enough for comfortable access to your pots. Also, ensure it doesn’t obstruct existing lighting or traffic flow.
- Determine Weight Capacity: Understand both the pot rack’s maximum weight limit and the combined weight of the pots and pans you intend to hang. Overloading is a common safety hazard.
- Locate Ceiling Joists: This is the most critical step. Ceiling joists provide the necessary structural support. Use your stud finder to locate at least two joists that align with the desired placement of your pot rack. Mark them clearly. Never install a heavy pot rack directly into drywall without anchoring it to a joist or using specialized, heavy-duty anchors designed for significant loads.
- Choose the Right Pot Rack: Select a size, shape, and material that complements your kitchen’s aesthetic and fits the available space. Consider the number and size of pots you need to store.
- Gather All Supplies: Double-check that you have every tool and piece of hardware listed above before starting.
Step-by-Step Guide: Installing Your Ceiling Pot Rack Safely
With careful planning, you’re ready to install your pot rack. Follow these steps meticulously:
- Marking Your Spot: Using your stud finder, identify and mark the exact center of at least two ceiling joists where your pot rack will hang. Measure the distance between the mounting points on your pot rack and transfer these measurements accurately to your ceiling, ensuring your marks align precisely with the joists. Use a pencil to mark the drilling points clearly.
- Drilling Pilot Holes: Select a drill bit slightly smaller than the diameter of your mounting hardware (e.g., eye hooks). Carefully drill pilot holes at the marked locations. Drilling a pilot hole prevents the wood from splitting and ensures your hardware screws in straight and securely.
- Installing Mounting Hardware: Screw the eye hooks (or other provided mounting hardware) into the pilot holes until they are firmly seated and snug against the ceiling. If you are using toggle bolts for non-joist installation (again, with extreme caution), follow their specific installation instructions carefully. Ensure all hardware feels completely secure.
- Attaching Chains: Most pot racks connect to the ceiling mounts via chains. Attach one end of each chain to the ceiling mounting hardware and the other end to the designated points on your pot rack. Double-check that all connections are secure and that the chains are not twisted.
- Adjusting Height and Leveling: With the pot rack now suspended, use your measuring tape to ensure it hangs level and at your desired height. You may need to adjust the chain links to achieve perfect balance and clearance. A comfortable height typically allows you to reach pots without straining, while also avoiding head bumps.
- Loading Your Pot Rack: Once the rack is stable and level, you can begin hanging your pots and pans. Distribute the weight as evenly as possible across the rack to prevent undue stress on any single mounting point. Start with heavier items near the mounting points and lighter items towards the center.
Common Mistakes to Avoid During Installation
Ignoring these potential pitfalls will ensure the longevity and safety of your pot rack:
- Not Locating Joists: This is by far the biggest and most dangerous mistake. Relying solely on drywall for support will almost certainly lead to the rack falling.
- Overloading the Rack: Always respect the manufacturer’s weight limit. Heavier cookware than the rack is designed for can cause it to pull away from the ceiling.
- Using Inadequate Hardware: Don’t substitute the included hardware with lighter-duty alternatives. If you need different anchors, ensure they are rated for the intended load.
- Incorrect Height Placement: A rack that’s too low is a head hazard, while one that’s too high defeats the purpose of easy access.
- Rushing the Process: Take your time with measurements, use your stud finder diligently, and ensure every connection is secure.
Maintaining Your Ceiling Pot Rack
Maintaining your ceiling pot rack is straightforward and helps preserve its appearance and functionality. Regularly wipe down the rack with a damp cloth to prevent grease and dust buildup, especially if it’s located near your stovetop. Periodically, check all mounting hardware and chain connections for any signs of loosening or wear. If you notice any wobbling or creaking, remove the pots, inspect the installation, and tighten any components as necessary. Redistributing cookware if you notice an imbalance can also extend the life of your rack.
“A properly installed pot rack can transform a cluttered kitchen into an organized haven, but safety must always be the top priority. Never guess where your joists are.” – Sarah Chen, Professional Home Organizer
Conclusion
Installing a ceiling pot rack is a rewarding DIY project that significantly enhances kitchen organization and aesthetics. By meticulously following this guide, from careful planning and joist location to precise installation and regular maintenance, you can ensure your pot rack is a safe, stylish, and highly functional addition to your home. Reclaim your counter space, enjoy easy access to your cookware, and elevate your kitchen’s design. What’s your favorite pot rack setup for ultimate kitchen efficiency?
Frequently Asked Questions
Can I install a ceiling pot rack without drilling into a joist?
|
Our Picks for the Best Pot rack in 2026
As an Amazon Associate I earn from qualifying purchases.
|
||
| Num | Product | Action |
|---|---|---|
| 1 | MUDEELA 8-Tier Pots and Pans Organizer under Cabinet, 15.83" Height Heavy Duty Pot Pan Organizer Kitchen Cabinet Organization and Storage, Adjustable Pot Rack for Frying Pan, Cast Iron Skillet, Black |

|
| 2 | CHOEZON 31.7-Inch Hanging Pot Rack, Space-Saving Pot Hanger for Kitchen, Ceiling Pan Hanging Rack with 16 Detachable S Hooks, Sturdy Metal Frame, Industrial Style, Rustic Brown and Black TPR09BF |
|
| 3 | CHOEZON Pots and Pans Organizer Rack, Kitchen Bakers Rack, Multi-Tier Storage Shelf, Kitchen Island Table, Cooking Rack with Pots and Pans Storage, Rustic Brown and Black TPR60BF |
|
| 4 | VyGrow 28 Inch Pot Rack Wall Mounted, 2 Tier Pots and Pans Organizer with 20 Hooks and 6 Pot Lid Holders, Heavy Duty Steel Pot and Pan Hanger for Kitchen Cookware Utensils Storage 34.7" Lx13 Wx26.4 H |
|
| 5 | HULISEN Pots and Pans Organizer Under Cabinet, Expandable 2-Tier Pots and Pans Lid Storage Rack Holder with 10 Dividers, Adjustable Height Under Sink Organizer, Maximize Kitchen Storage Space |
|
| 6 | MUDEELA Pots and Pans Organizer Rack under Cabinet 14.55in Height, 8-Tiers Adjustable Pot Rack with 3 DIY Methods, Pot Lid Organizer inside Cabinet for Kitchen Pantry Organization and Storage |
|
| 7 | ORDORA Pots and Pans Organizer: under Cabinet, 20.8" Height Heavy Duty 120LBS Pots Pans Organizer Rack for under Cabinet 8-Tier Adjustable for Big Stockpots, Dutch Oven, Cast-iron Pans, Heavy Cookware |
|
| 8 | CHOEZON Pot Racks, 6-Tier Cookware Stand, Triangle Shelf Storage Tower for Kitchen, Pans Pots Storage Rack, Metal Wire Shelf Organizer, Corner Shelf, for Kitchen, Living Room, Black TPR15BB |
|
| 9 | ORDORA Pots and Pans Organizer for Cabinet 16.61 Height, 8 Tier Pot Organizers Rack with 3 DIY Methods, Adjustable Pan Organizer under Cabinet Kitchen Organization and Storage |
|
| 10 | MUDEELA Pots and Pans Organizer Rack for under Cabinet, Expandable 11.81''-22.85'' Pot Lid Kitchen Cabinet Organizer Holder with 10 Adjustable Compartment Cutting Board Organizer for Pan Lid, Bakeware |
|
While possible with specific heavy-duty anchors designed for drywall, it’s generally not recommended for significant weight. Installing directly into ceiling joists offers the most secure and safest option for your pot rack and valuable cookware. Always prioritize attaching to structural elements.
How much weight can a typical ceiling pot rack hold?
The weight capacity of ceiling pot racks varies widely by model and installation method, but most residential racks designed for joist installation can hold between 25 to 75 pounds. Always check the manufacturer’s specifications and consider the combined weight of your heaviest pots and pans.
What’s the ideal height for a ceiling pot rack?
The ideal height for a ceiling pot rack typically allows for comfortable access to your cookware without obstructing your head clearance or view. Generally, the bottom of the rack should be at least 18-24 inches above your head or above any countertop/island surface below it, often around 5.5 to 6 feet from the floor.
What tools do I absolutely need for this DIY project?
For a safe and successful ceiling pot rack installation, the absolute essential tools include a stud finder to locate joists, a drill with appropriate bits, a sturdy ladder, a measuring tape, and a pencil. Safety glasses are also highly recommended.